HTC Incredible 2 USB charging port repair


So I happened to come across a broken HTC Incredible 2. My sister had replaced it with an iPhone when the Incredible stopped charging. She had taken it back to the Verizon shop where they tried replacing the battery but it still wouldn't charge. It seems like such a waste to throw away such a fine piece of hardware which clearly works but can't recharge the battery.

Long story short, a lot of people have had a similar problem and had success by simply replacing the USB chargin port of the phone. As it turns out the repair is not even that difficult. The phones design is incredibly modular, with everything connected to the mainboard by ribbon cables. In this post I document the process of disassembling the HTC Incredible 2 and replacing the USB charging port.

The part I ordered was For HTC Incredible S II 2 Charging Charger Port USB Dock Connector Part Repair. The cost was $9 shipped and it came with a screwdrive and plastic pry tool.

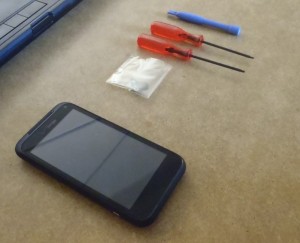
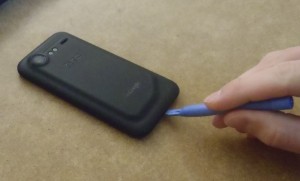
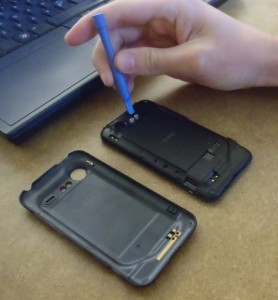
In addition to these tools, I also used a pair of tweezers, an exacto knife, and a very small phillips screw driver. Start by removing the outer cover. This can be done with the plastic pry tool or a coin, or a credit card with one corner shaved down a bit. There is a little tab at the bottom of the phone to get you started.

Then remove the battery and the simcard. These are pretty easy, just take them out.

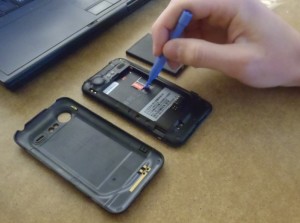
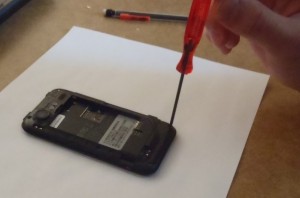
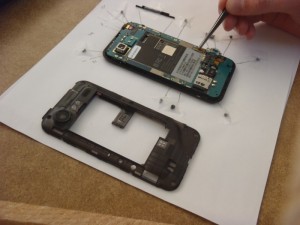
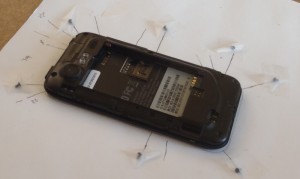
Now there are seven (7) star screws to remove in order to get the inner housing cover off. One of them is covered with a green "void" sticker (removing this screw will void the warranty, which I assume is already voided). If you dont have a star screwdriver (though one came with my replacement part) a small flathead should work. you can look at the next picture to see where the screws are located.

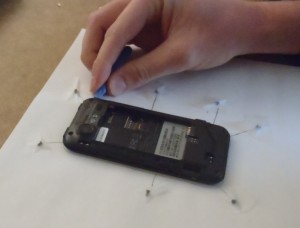
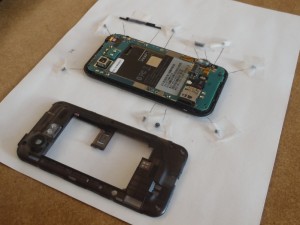
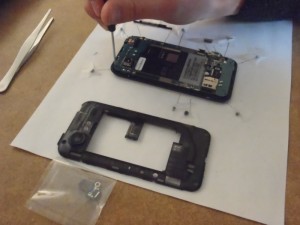
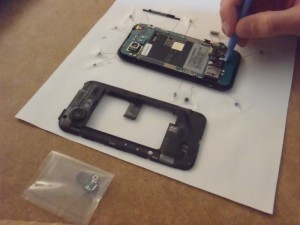
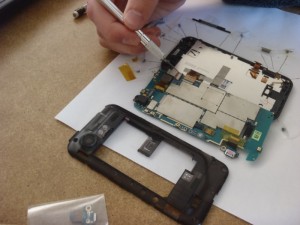
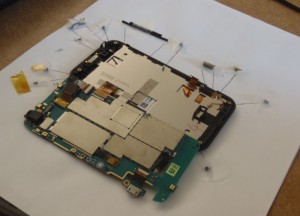
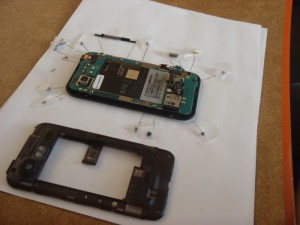
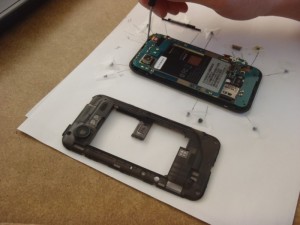
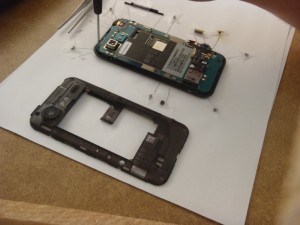
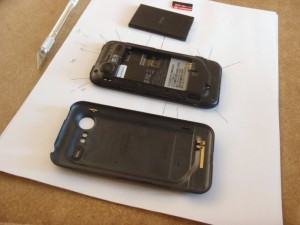
I used a piece of paper and take to diagram where all the parts came from as I took them off. This is a handy way to keep track of where stuff goes when you put it back together. Anyway, now that the screws are removed we may remove the inner back of the case.

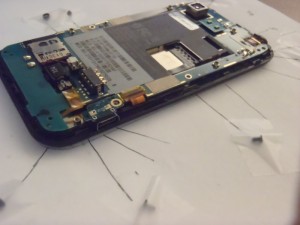
For me, the case took some work. Note that the volume rocker switch is a part of the piece we are removing so it is safe to pry under it, however the little piece of plastic over the headphone jack is not part of the piece we are removing, so don't try to pry it out too. During this process, the USB protective housing and the little rubber cover to what looks like an antenna port came out. I just added them to my diagram so I knew how to put them back.

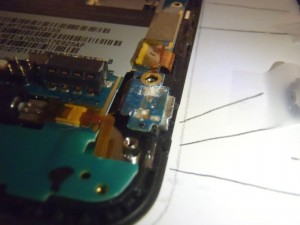
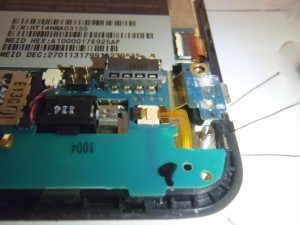
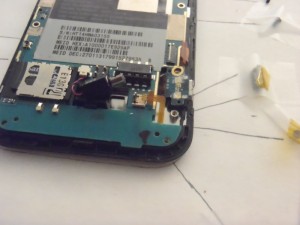
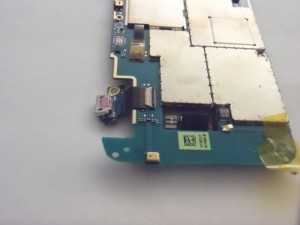
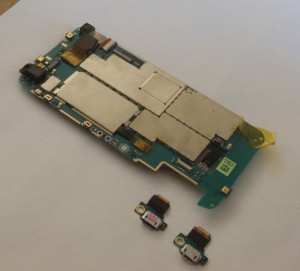
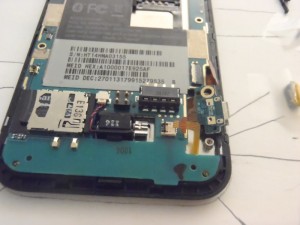
Now we can see the (presumable) culprit of the charging problem. The USB charging port has some corrosion on it. I've read that many people have had problems charging and that replacing this part will fix those problems. I'm making an $9 bet that this is my problem too.

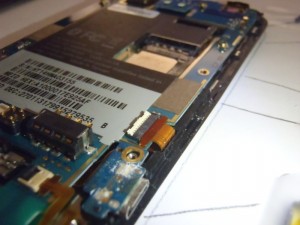
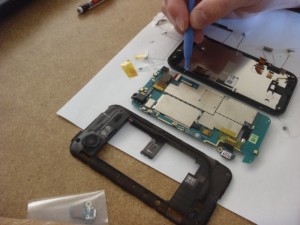
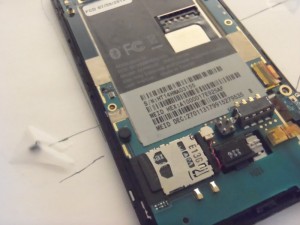
Now we have to disconnect two ribbon cables on the right side of the main board. They are covered with some ESD tape. I saved the tape and put it back on when I reassembled the phone. I'm not sure if they're useful but I figured perhaps they'd relieve some stress on the attach points.

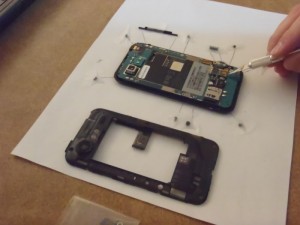
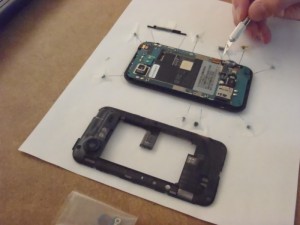
To remove the ribbon cables pop the tab on the back of the attach point. With the tab up, the ribbon cable should slide right out.

Now remove the two small philips screws. One is holding a piece of plastic over the headphone jack. The other is holding the main board onto the case.

Next we need to pop out the vibrator motor. Once the motor is removed from it's holder, you may leave it connected to the mainboard. It's not held in with any tabs so just pull it on out with your pry tool.

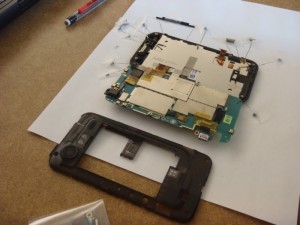
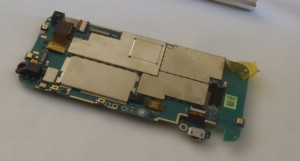
Now it's time to separate the mainboard from the housing. The mainboard is still connected by a ribbon cable on the left side, so lift up from the right side. The board is held down by two attach points. It fits under the headphone jack at the top, and it is clipped in place at the vibrator motor housing. I used the pry tool to separate the board from the clip at the vibrator motor housing, and then pulled slightly downward to remove it from under the headphone jack.

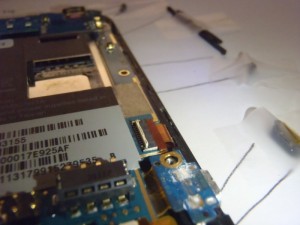
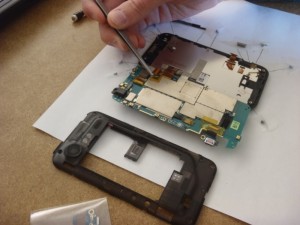
Now we can remove the ribbon cable that is attaching the board to the screen. In hindsight this is not really necessary since our part is already exposed, but I guess it make things a bit easier later. Start by removing the plastic tape covering the ribbon cable attach point. Then pop the lever, and slide out the ribbon cable.

Now that the mainboard is separated from the housing we can remove the USB port. It's just another ribbon cable so remove the tape, flip the tab, and slide out the part.

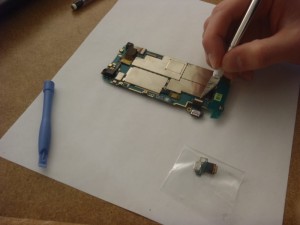
The we simply swap in the new part. Insert the ribbon cable, make sure it's snug inside the attach point, then close the tab.

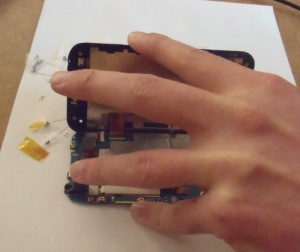
Now we reattach the mainboard to the housing by the big ribbon cable on the left (screen?). This was a bit tricky since the ribbon cable is kind of short. I had to pull a five finger maneuver to get the thing in a position where I could insert the cable without it sliding back out. Once the cable is in, close the tab.

Now simply flip the mainboard back over so that it is lying on the housing. Check the camera to make sure it didn't slide out. Mine had slid out and was sitting at a funny angle so I had to shift it back into place. Also make sure that the two small ribbon cables on the right side are pulled out and aren't buried under the mainboard.

Now we can snap the mainboard back into place, and return the vibrator motor back to it's home.

Now screw back in the two phillips screws. One holds the plastic cover over the headphone jack, and the other holds the mainboard onto the housing.

Now we reattach the small ribbon cables on the right side. Slide them into the attach point, close the lever, and then replace the tape (if you like).

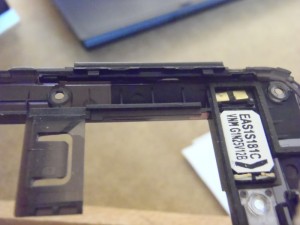
Now we can snap the cover back on. Start by replacing the USB port cover. This fits into the housing by two tabs that are under the port. Replace the rubber cap on the left side if it fell off. Also return the volume rocker to it's place inside the back of the housing (the part that you took off) if it fell out.

Then simply snap the back of the housing into place, and screw all the screws back in.

Now you can replace the battery, simcard, and outer cover.

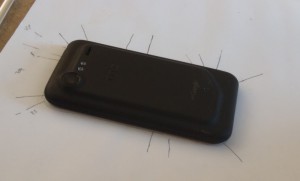
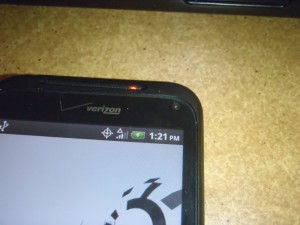
Plug in the phone, and if nothing starts sparking/smoking perhaps you have indeed fixed your problem. Not that this is proof, but the phone now at least tells me it's charging the battery. We'll see if it ever gets to 100%.

Notes on running the same Windows 7 installation in a virtualbox and natively


It seems the initial install can be done either natively or in a virtualbox. I chose to install in virtualbox first, so that I didn't have to worry about changing the boot order of drives in bios.

I created a raw disk vmdk using the command

VBoxManage internalcommands createrawvmdk-filename Alucard_win7.vmdk -rawdisk /dev/sdb

Note that I did not restrict partitions or specify an MBR file. This is because I want windows to actually put its loader in the MBR of the /dev/sdb disk.

I created a virtualmachine, attaching this disk as a SATA drive, and putting the windows 7 install iso as the cd drive. After installation, I did not enter a serial number, but just "continued". After windows loaded I ran "Windows Loader" installation to handle the serial number issues.

Anyway, after this all happened Ubuntu had trouble reading from /dev/sdb. It could not enumerate the partitions. In order to solve this I rebooted, changed boot disk order, and booted into windows natively. It worked without requiring the repair disk, but note that in some tutorials they say that you'll need to repair the installation.

After rebooting again, and changing the boot disk order, ubuntu started and could see the partitions on /dev/sdb. I probably didn't need to change boot disk order, but probably just needed to restart so that the drive was re- enumerated.

Anyway, after this, I ran

sudo update-grub

and windows 7 was found. The grub entry that was created would boot windows 7 natively without any problems.

Enable WOL through a Linksys Router


This is blatent copy-paste job from here put here for my own posterity.

This all works very well if the computer sending the Magic Packet is on the same LAN as the sleeping computer, but requires some additional effort to get working over the Internet. Especially if the very common Linksys WRT54G is your wireless router. The WRT54G setup page employs javascript to prevent the user from entering a broadcast address, so there is a work around. Here’s what to do to set this up:

  • Enable WOL on your computer. This is usually a setting in the BIOS. (This may not be possible if you are using a wireless card. Only the very latest cards support Wireless Wake On Lan.)
  • If you don’t already have Firefox, download and install it.
  • Download and install the DOM Inspector Firefox Add-on.
  • Using Firefox, open your Linksys WRT54G admin page (usually 192.168.1.1)
  • Click on Applications & Gaming
  • Add a new entry: Application=”WOL”, Start=”9″, End=”9″, Protocol=”UDP”, IP Address=”200″
  • In Firefox, click on Tools, then DOM Inspector.
  • Use DOM inspector to find the “WOL” entry and change IP Address from 200 to 255. (Firefox will red highlight the areas you have selected in DOM Inspector, this makes it easier to narrow down to the correct element.)
  • Click “Save Changes” on the Applications and Gaming page.
  • Download and install a Magic Packet program that can send a packet over the Internet. I like this one: http://magicpacket.free.fr/

You should now be able to wake your computer up from where ever you are. (Also, I should say that my router has firmware version 8.00.5. I don’t know if this matters, since I don’t have any other router to test it on.)

Note to self: this is probably unsafe and bad. Also, I used firebug.

cppfontconfig - Simple C++ interface into fontconfig


Lately I've been trying to learn how to use (and I mean really use) the open source font stack. Since I tend to greatly prefer c++ over c, as part of the process of learning these libraries I figured I'd workout API wrappers. Since the font stack libraries are generally object oriented, I figured a C++ wrapper around these would be easy to accomplish.

As a start, I wrote cppfontconfig, a C++ wrapper around font config.

github

I'm not sure if the design is good or if it's even useful, I guess we'll see.

Exception Streams in C++


Here's a short but handy C++ Snippet. I was looking for a way to quickly generate runtime exceptions with useful information about the current program state. My process was:

  1. Create a string stream
  2. Build the message
  3. Throw the exception using the string from the stream

I felt like this was particularly cumbersome and quite annoying, especially for doing things like string parsing or SQL because there are a lot of places in the code where error checking is required.

In any case, I came up with this simple little class tempate which sits in a single header file and is included in the cpp file where it is to be used.

#ifndef _UTILITY_EXCEPTIONSTREAM_H_
#define _UTILITY_EXCEPTIONSTREAM_H_

#include 
#include 

namespace utility   {

/// used to simplify the process of generating an exception message
/**
 *  Derives from stringstream so provides an ostream interface, but throws
 *  an exception with the contents of the string when the object is destroyed
 *
 *  \tparam Exception_t must be an exception type which accepts a
 *                      const char* in it's constructor
 *
 */
template 
class ExceptionStream :
    public std::stringstream
{
    public:
        ~ExceptionStream()
        {
            throw Exception_t( str().c_str() );
        }

        std::ostream& operator()()
        {
            return *this;
        }
};


typedef ExceptionStream ex;


} /* namespace utility */
#endif /* EXCEPTIONSTREAM_H_ */

Usage is like this:

ex fExp;

fExp = evalf( m_expression["radius"].subs(m_x == iRadius));
if( is_a(fExp) )
    radius= ex_to(fExp).to_double();
else
{
    utility::ex()() << "GiNaC failed to parse radius expression: "
                    << fExp;
}

Here I'm using GiNaC to parse a string into a mathematical expression. If the process fails I want to throw a runtime exception (typedef'ed as utility::ex).

The class derives from string stream so it works just like a string stream… building a string by catting together the RHS of all the string operators. The magic is that the destructor for the class throws an exception. The message for the exception is the string that was built.

It's a very handy time saver… though I'm not sure if it's actually safe to use. If the destructor throws an exception, is the object memory still freed?

Sqlitemm: C++ wrapper for sqlite3


As part of writing inkbook, I decided to use sqlite3 for data storage. The C/C++ API is actually a C API, and while it is object oriented and rather intuitive, it's just not C++. Considering that the API is very simple and, in particular, the subset of the API I wanted to use was very simple, I went ahead and wrote a quick wrapper.

Sqlitemm provides a C++ style interface to creation of database connections and statements (as in Connection and Statement are classes). Objects are reference counted using Glib::RefPtr so memory management is a bit easier.

You can find the project in my tracker , but heres an example of it's usage:

#include

int main(int argc, char** argv)
{
    // open a connection to a sqlite database
    Glib::RefPtr sqlite =
            sqlite::Connection::create("/path/to/db.sqlite");

    // we'll reuse this variable for different statements
    Glib::RefPtr stmt;

    // prepare a read statement
    stmt = sqlite->prepare("SELECT * FROM table_a WHERE field_a=?");

    // bind a value to one of the parameters
    stmt->bind(1,10);

    // execute the select statement
    stmt->step();

    // read out the result set
    while(stmt->hasAnotherRow())
    {
        // retrieve the first column of the result set as an integer
        int             field_a = stmt->get(0);

        // retrieve the second column of the result set as a string
        std::string     field_b = stmt->get(1);

        // retrieve the third column of the result set as a double
        double          field_c = stmt->get(2);

        // do something
    }

    // if we want to reuse the statement we need to call this
    stmt->reset();

    // prepare a second statement, note that all memory allocated for the
    // first statement is released here, because the smart pointer is
    // reassigned and the object it points to only has one outstanding reference
    stmt = m_sqlite->prepare("UPDATE table SET field_a=? WHERE field_b=?" );
    stmt->bind(1,20);
    stmt->bind(2,"something");

    // now actually execute the statement
    stmt->step();

    // note that we do not have to explicitly close the connection, when
    // the sqlite variable goes out of scope, the smart pointer will drop it's
    // reference to the underlying Connection object, and the connection
    // object will be destroyed. The databse is closed during the destructor
    // of the Connection object.
    return 0;
}

Texmake: a makefile generate for latex projects


texmake is a makefile generator, much like cmake. In fact, it originally started with me looking for ways to make cmake work with latex documents. After a bit of work, I decided the system was too much designed around the c/c++ build process, so I started working on some tools to simplify my life.

Keeping it simple

texmake tries to eliminate as much work as possible from the document writer. It will try to figure out and resolve dependencies, including graphics files which require conversion from their source format. It also allows for out-of- source builds, so that the source directory doesn't get all cluttered with the intermediate files that latex generates.

Example

Consider this scenario: We have a very long complicated report to write (i.e. software manual, end-of-project report, thesis, how-to-book). We want to generate both a full version, and a simplified quick-start kind of version. The quick start version will contain a subset of the chapters of the full version. The quick start will be published in PDF and HTML (i.e. web- friendly). The long version will probably be a large document and we don't really want it to be browsed on-line, but it is likely to be printed, so we'll put it in pdf and dvi format, as well as epub for people who have e-readers.

example project

In the process of making this document, we've generated many image files. Some of them are hand drawn SVGs. Some of them are generated tikz images. Some of them are diagrams drawn in DIA or plots in GNU Plot. Some of these figures are shown in multiple different chapters (because the author does not want to just refer the user back to a previous page, which is unnecessary in an electronic format, but may be more meaningful in a print format).

Furthermore, we have some things that need to only be included in each version. For instance each version should include some kind of header which tells the reader where he can find the other versions online, or where he can order them from.

Now, we can go maintain a makefile structure that manages all of this quite easily, but we will have to build it by hand. Every time we add a new chapter or image or output format, we have to go add a line to a makefile somewhere. Wouldn't it be nice if all of that work would just happen?

Features

here are a list of features that I have implemented or am working on

  1. don't rebuild the document unless it needs it
  2. multiple documents in the same project, potentially sharing various pieces of content
  3. monitor documents dependency on package, style, and class files so that document is rebuilt if these are updated
  4. monitor dependencies on all included files, so that if any included file is updated, the document is rebuilt
  5. only run bibtex if needed
    1. one of the database files is updated
    2. there are unresolved citations in the document
  6. rerun latex until it stabilizes
  7. discover and automatically convert graphics source files (like svg) to the kind (pdf)latex(ml) understands (pdf,eps,png)
  8. out of source builds so that sources can be in version control without complicated ignore rules
  9. caches values of environment variables and binary locations so that initial environment does not have to be manually set-up each time the document is built
  10. colorize output to make it clear where and when things get messed up

Usage

texmake relies on the presence of a texmakefile in the directory of the document you want to build. The texmakefile simply lists source files (.tex documents) and the output files that should be built from them. Multiple output files can be built from the same input file, so that the same latex source can be used to generate pdf, dvi, and xhtml versions (so-called single source builds).

texmake init is called from the build directory, accepting a single parameter being the directory that contains the root texmakefile. texmake resolves the absolute path to all the tools it needs (latex, pdflatex, bibtex, latexml, kpsewhich, …), and caches those locations. (TODO: also cache environment variables for latex and search paths for kpsewhich). It generates a makefile in that directory which contains rules for all of the output files registered, and creates directories, if they're missing, in which the output files will be located.

texmake relies on GNU make to determine when documents need to be rebuilt. This makefile includes several other makefiles (if they exist) containing detailed dependency lists for each of the output files. If the output files have never been built, these included files do not exist, but that's OK because it is already clear to make that it needs to build the output files.

The output files are built with texmake build. The texmake builder runs (pdf)latex(ml) with all the necessary switches to make sure that the source directory and output directory are searched for required files. The builder also scans the output of latex to build a list of all the files that latex loads (for the dependency graph) as well as all the files that are missing. If the missing files are graphics files, then it generates make rules for how to build those graphics files from similarly graphics files in the source directory (it is assumed the source file has the same name, but a different extension). This way, an svg source file can be used to generate pdf,eps,or png images depending on if the document being built is dvi,pdf, or xhtml (respectively). If the file in the source directory is already compatible with the latex that is being used, then no conversion is necessary. If the missing file is a bibliography file, then bibtex is run to generate the bibliography file. The builder also scans the output of bibtex to add bibliography database files (.bib files) to the dependency graph. Bibtex is also run if there are missing citations reported by latex (this is because bibtex will not include bibliography entries that are not cited in the latex source, so if a new citation is added, bibtex will need to be rerun). The texmake builder also scans the output of latex for rerun suggestions. It will rerun latex if it had to run bibtex, or if latex itself suggested that it be rerun (to get cross references straight, for example).

Major TODO items

  1. cache environment variables in init
  2. use diff to determine if TOC's get updated (they will get touched by latex so make will always think they're new) to determine of a rerun is necessary for TOCs
  3. add image generation rules for tikz
  4. consider a more modular design for making intermediates (i.e. run a program, like matlab, to generate intermediates)

Code

The texmake code is in github.

directoryWatch


As I was working on texmake I decided that I didn't want to figure out what all the possible auxilary output files would be for a latex document. Also, I'm suspecting that it will depend on what packages are included and things. Anyway, I wanted a way to just monitor the build directory and see all the files that were created while running latex. It turns out this is very easy on linux. This is a very simple program which watches a directory, and will print out any files that are created, modified, opened, closed, moved, or deleted. It prints out the file name, followed by a comma, followed by the notification event.

You can find the code on github

svg2pdf and svg2eps (convert svg to pdf or eps from the command line)


I've been working on a new makefile for my latex projects. The goal is to have single-source builds of dvi, pdf, and xhtml documents. I ran into a problem of generating figures. latex expects eps graphics, pdflatex expects pdf figures, and latexml expects png figures (or will try to generate them). In order to generate documents with make, I need a way to generate eps and pdf figures from svg sources (I usually use inkscape to make my figures). Inkscape can be run from the command line, but I dont want to install inkscape on my server because that will require installing a ton of libraries that don't make sense to have on a server with no graphical interface.

As it turns out, writing such a command line tool is very easy with librsvg and cairo. Carl Worth of redhat has produced a nice demo of svg2pdf which can be found at freedesktop.org. I cloned his project, create a cmake project out of it, and made a trivial modification to turn it into svg2eps as well.

You can find my code at https://github.com/cheshirekow/svg2x.

Throw: A Compiz Plugin


One feature that I've really been wanting from compiz is to give windows a bit of momentum when I'm moving them around. In other words, if I flick a window with the pointer and then let go, I want it to continue moving, so that it can be "thrown" across the screen. Thankfully, someone involved in compiz wrote such a plugin, found on his blog here. Unfortunately, the strategy that he uses doesn't work well for me. There are essentially three problems with it:

  1. In order to calculate the velocity of the window after it is released, he compares the window position at the time it is released to the window position at the time it was grabbed, and calculates the delta. This leads to weird behavior when the users is indecisive and moving the window around sporadically before releasing it.
  2. The velocity of the window has an unnatural association to the actual "velocity" that the user was moving it with.
  3. The velocity appears to be zero when using a pen-tablet (wacom) input because my hand generally stops before the pen moves out of range of the tablet.

While the compiz API documentation is in a very sad state, Sam's plugin showed me all the parts of the API that I needed. I rewrote the plugin to essentially low-pass the velocity of the window, sampled at the compiz frame rate. At each "movement" event, I update the delta in the x direction and the y direction. At each "frame" of compiz, I bake the accumulated deltas, along with the time (in ms) since the last sample. The accumulated deltas and the number of milliseconds are stored in a ring buffer. When the window is released, the buffer is averaged to get a window velocity in pixels-per-millisecond.

I also augmented the window structure to store a floating point representation of the window location. Together with the low-pass on the velocity, the outcome seems to be a lot smoother.

The window velocity exactly matches what I "feel" like the velocity of the window is when I let go of it. Also, the filter only has enough history for a couple of frames so weird movement of the window prior to release is "forgotten", and only the "most recent velocity" is used.

The code for the plugin can be found in my github